Introduction
Laravel Installer is a plugin-based installation wizard for Laravel applications. It handles first-time setup through an interactive, step-by-step interface.
Instead of manually editing .env files and running commands, users click through a clean wizard that configures everything automatically.
#Quick look
Configure your installation steps in config/installer.php:
'steps' => [ \Olakunlevpn\Installer\Steps\WelcomeStep::class, \Olakunlevpn\Installer\Steps\RequirementsStep::class, \Olakunlevpn\Installer\Steps\PermissionsStep::class, \Olakunlevpn\Installer\Steps\EnvironmentStep::class, \Olakunlevpn\Installer\Steps\InstallingStep::class, \Olakunlevpn\Installer\Steps\CompletedStep::class,],Add plugin packages for additional functionality:
composer require olakunlevpn/laravel-installer-welcomecomposer require olakunlevpn/laravel-installer-licensecomposer require olakunlevpn/laravel-installer-accountSteps auto-register and appear in the installer at their configured positions.
#Why you'll love it
The installer is plugin-based. Core functionality lives in the main package, and you add features through separate packages. Each plugin is self-contained with its own config, views, translations, and logic.
Everything uses reusable components. No copying HTML between plugins. Build a form in minutes using pre-built components for inputs, buttons, and alerts.
It's framework-aware too. The installer knows it's running before migrations exist. Form validation automatically strips database rules like unique and exists until tables are ready.
#Core steps
The installer includes these built-in steps:
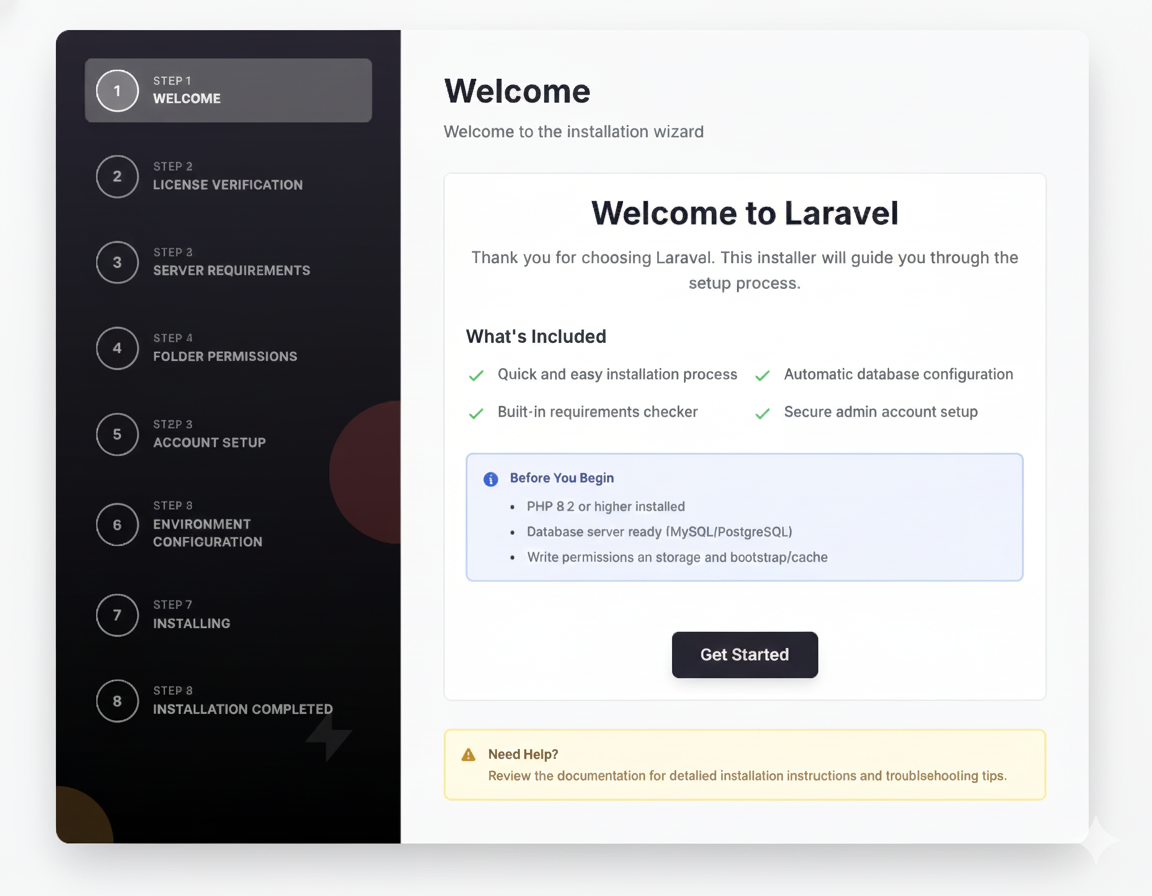
- WelcomeStep - Introduction and getting started
- RequirementsStep - PHP version and extension checks
- PermissionsStep - File and directory permissions
- EnvironmentStep - Database and mail configuration
- InstallingStep - Runs migrations and setup
- CompletedStep - Success screen with next actions
#Available packages
Extend functionality with official packages:
- Welcome - Customizable welcome screen with your branding
- License Verification - Validate purchase codes via API
- Account Setup - Create admin user during installation
Each package installs via Composer and auto-registers its step.
#Perfect for
The installer shines when you're building:
- SaaS applications with complex setup workflows
- Applications requiring license verification before installation
- Multi-tenant systems needing initial configuration
- Apps with strict server requirements checking
- Any Laravel app that needs guided setup for end users
You can customize every step without touching core code. Add your own steps, use your own styling, integrate with your services.
#What it isn't
The installer isn't a database seeder. It doesn't populate your app with demo data - it configures the basics so your app can run.
It also doesn't handle post-installation updates. Once installed, it marks itself complete and redirects to your app.
#Under the hood
The installer uses Livewire 3 for reactive components and Tailwind CSS 4 for styling. Everything is dark mode ready out of the box.
Steps are Livewire components that store data in session until migrations run. Then they execute database operations in the correct order during the Installing step.
Session-first approach: Data is always saved to session first, then persisted to database after tables exist. This prevents errors and data loss.
#Installation syntax
Steps register in your config/installer.php:
'steps' => [ \Olakunlevpn\Installer\Steps\WelcomeStep::class, \Olakunlevpn\Installer\Steps\RequirementsStep::class, \Olakunlevpn\InstallerLicense\Steps\LicenseVerificationStep::class, // Plugin step \Olakunlevpn\Installer\Steps\EnvironmentStep::class, \Olakunlevpn\InstallerAccount\Steps\AccountSetupStep::class, // Plugin step \Olakunlevpn\Installer\Steps\InstallingStep::class, \Olakunlevpn\Installer\Steps\CompletedStep::class,],Plugin steps control their position via their own config:
config/installer-license.php:
'step_position' => env('LICENSE_STEP_POSITION', 2),The installer automatically sorts and displays steps in the correct order.
#Getting started
Head over to the installation guide to add the installer to your Laravel app. Then check out the quick start to see it in action.
Want to install plugin packages? See the packages index for available options.
Want to create your own steps? The plugin creation guide walks you through building a custom installation step.
#Components & helpers
The package ships with 18 reusable Blade components:
- Form fields (input, textarea, select, checkbox, radio)
- Buttons with loading states
- Alerts (success, error, warning, info)
- Layout helpers (cards, sections, icons)
Plus 4 helper traits and 4 utility classes to speed up plugin development.
Check the components documentation for usage examples.
#Questions or issues?
Found a bug? Have a feature idea? Open an issue on GitHub.
Want to see what's new? Check the changelog in your package or visit the GitHub releases page.